Creating a Hello World Contao Plugin: Front- & Backend-development
Written on by rd
Table of contents
Skip navigation- The data structure of the plugin
- Contao plugin: The base structure
- Building the Contao "Hello World" frontend-Module
- Contao Backend module: Structure and database integration

All beginnings are difficult. Even experienced developers like us can getting started with new technologies can bequite the challenge. To understand the concepts behind the development of a Contao-plugin and use them to expand our own Contao website with innovative plugins requires time. The documentation provided by Contao offers an allright overview, alas, only to a certain degree. The more specific questions we ask, the harder it gets to find answers. For that reason we've decided to write an article about how to create your very own "Hello Word" Contao plugin. This article is written in a simple way and provides you with the interesting background knowledge required to write a custom Contao plugin. In this article, you'll learn how to set up the base of the a plugin, how to display the classic "Hello World" text in the frontend, what the data structure is supposed to look like and how to create a database connection. By the end of this article, besides showing "Hello World", to plugin will also be able to display additional messages that will be defined in the backend.
The plugin can be downloaded on Github by following this link. Feel free to use this code as base and for testing purposes.
The data structure of the plugin
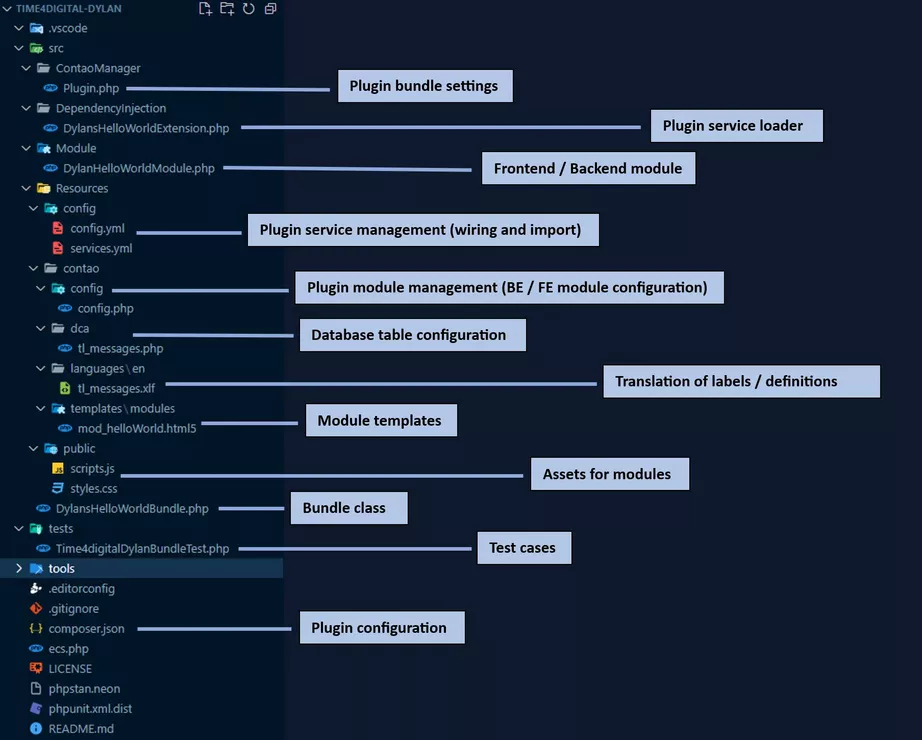
The file structure of the Contao plugin must be adhered to, so that the Contao Manager recognizes and loads the plugin as such.

Contao plugin: The base structure
The first step is to create to project structure so that it is recognized as such an can be installed using the Contao Manager.
The following classes need to be created and adjusted:
The structure of Composer
Contao uses PHP Composer for modules, extensions and plugins. Therefore, our plugin requires a Composer configuration file within the root folder of the Plugin. When using the example JSON-file of Composer, make sure to edit the values marked with a '#'.
./composer.json
{
  "name": "time4digital/dylans-hello-world-bundle",               #Plugin name
  "description": "Dylan's Hello World Plugin",                    #Plugin description
  "license": "LGPL-3.0-or-later",
  "type": "contao-bundle",
  "version": "0.0.4",                                             #Plugin Version
  "authors": [
    {
      "name": "Ribeiro de Serra Dylan",
      "homepage": "https://www.time4digital.lu"                   #Author
    }
  ],
  "homepage": "https://contao.org",                               #OPTIONAL: Your website
  "support": {
    "issues": "https://github.com/ridy01-backup/contao-plugins/issues",   #OPTIONAL: Link to the Git-repository
    "source": "https://github.com/ridy01-backup/contao-plugins"
  },
  "require": {
    "php": "^8.1",
    "contao/core-bundle": "^4.13 || ^5.0"                                   #The required dependencies
  },
  "require-dev": {
    "bamarni/composer-bin-plugin": "^1.5",
    "contao/manager-plugin": "^2.0",
    "phpunit/phpunit": "^9.5",
    "symfony/phpunit-bridge": "^6.1"
  },
  "conflict": {
    "contao/manager-plugin": "<2.0 || >=3.0"                                #Mark potential conflicts
  },
  "autoload": {
    "psr-4": {
      "Time4digital\\DylansHelloWorldBundle\\": "src/"                      #The wired path, Format: "VendorName\\BundleName\\": "PATH"
    }
  },
  "autoload-dev": {
    "psr-4": {
      "Time4digital\\DylansHelloWorldBundle\\Tests\\": "tests/"             #The path to for the tests, Format: "VendorName\\BundleName\\Tests": "PATH"
    }
  },
  "config": {
    "allow-plugins": {
      "bamarni/composer-bin-plugin": true,
      "contao-components/installer": true,
      "contao/manager-plugin": true
    }
  },
  "extra": {
    "bamarni-bin": {
      "bin-links": false,
      "target-directory": "tools"
    },
    "contao-manager-plugin": "Time4digital\\DylansHelloWorldBundle\\ContaoManager\\Plugin"    #Plugin-Link, Format:"VendorName\\BundleName\\ContaoManager\\Plugin
  },
  "scripts": {
    "all": [
      "@unit-tests",
      "@ecs",
      "@phpstan"
    ],
    "ecs": "@php tools/ecs/vendor/bin/ecs check src tests --config ecs.php --fix --ansi",
    "phpstan": "@php tools/phpstan/vendor/bin/phpstan analyze --ansi",
    "unit-tests": "@php vendor/bin/phpunit --colors=always"
  }
}
The structure of the Bundle class
The Contao Bundle is used to bundle the ressources together. This class requires no further specifications; extending the Symfony bundle is sufficent.
./src/DylansHelloWorldBundle.php
<?php
namespace Time4digital\DylansHelloWorldBundle;

use Symfony\Component\HttpKernel\Bundle\Bundle;

class DylansHelloWorldBundle extends Bundle
{

}
The structure of the Plugin class
The Plugin-class is used to load the bundle, so that the Contao Manager recognizes it as a Contao plugin.
./src/ContaoManager/Plugin.php
<?php

declare(strict_types=1);

namespace Time4digital\DylansHelloWorldBundle\ContaoManager;

use Contao\ManagerPlugin\Bundle\BundlePluginInterface;
use Contao\ManagerPlugin\Bundle\Config\BundleConfig;
use Contao\ManagerPlugin\Bundle\Parser\ParserInterface;
use Contao\CoreBundle\ContaoCoreBundle;
use Time4digital\DylansHelloWorldBundle\DylansHelloWorldBundle;

class Plugin implements BundlePluginInterface
{
    /**
     * {@inheritdoc}
     */
    public function getBundles(ParserInterface $parser)
    {
        return [
            BundleConfig::create(DylansHelloWorldBundle::class)
                ->setLoadAfter([ContaoCoreBundle::class]),
        ];
    }
}
The structure of the Dependency class
The dependency class is used to load configuration and service-files.
./src/DependencyInjection/DylansHelloWorldExtension.php
<?php
declare(strict_types=1);

namespace Time4digital\DylansHelloWorldBundle\DependencyInjection;

use Symfony\Component\Config\FileLocator;
use Symfony\Component\DependencyInjection\ContainerBuilder;
use Symfony\Component\DependencyInjection\Extension\Extension;
use Symfony\Component\DependencyInjection\Loader\YamlFileLoader;

class DylansHelloWorldExtension extends Extension
{
    /**
     * {@inheritdoc}
     */
    public function load(array $mergedConfig, ContainerBuilder $container)
    {
        $loader = new YamlFileLoader(
            $container,
            new FileLocator(__DIR__.'/../Resources/config')
        );

        $loader->load('services.yml');
    }
}
The config- and services-files
The config- and services-files are used to link the classes written inside of the bundle, so that the will be loaded und used during the installation.
./src/Resources/config/config.yml
imports:
- { resource: services.yml }./src/Resources/config/services.yml
services:
    _defaults:
        autowire: true
        autoconfigure: true
With that, we've set up the base of the plugin. We could zip the file up, and install it using the Contao Managar.
But that alone is not enough to display ‘Hello World’ in the front end.
Building the Contao "Hello World" frontend-Module
In this section, we'll create the frontend module that'll display the "Hello World" text on the website.
It will additionally load a CSS- and JS-file.
The structure of the frontend-module class
The module class is used to create modules within the backend, which can then in turn displayed in an article or similar.
./src/Module/DylanHelloWorldModule.php
<?php

namespace Time4digital\DylansHelloWorldBundle\Module;

use Contao\Module;

//Hier werden die CSS- und JS-Dateien gesetzt. Format: bundles/bundleName/dateiName.dateExtension
$GLOBALS['TL_CSS'][] = 'bundles/dylanshelloworld/styles.css';
$GLOBALS['TL_JAVASCRIPT'][] = 'bundles/dylanshelloworld/scripts.js';

class DylanHelloWorldModule extends Module
{
    // Hier wird der Name des Templates festgelegt.
    // Der Name muss mit dem Template übereinstimmen, das sich unter ./src/Resources/contao/templates befindet.
    protected $strTemplate = 'mod_helloWorld';

    protected function compile()
    {
        // Mit $this->Template->nameVariable erstellst du Variablen, die dann im Template verwendet werden können.
        $this->Template->message = 'Hello World!';
    }
}
Bringing the frontend-module into the backend
Thie Config PHP file is used to bring the modules into the backend.
./src/Resources/contao/config/config.php
<?php
use Time4digital\DylansHelloWorldBundle\Module\DylanHelloWorldModule;

// Frontend modules
// Create a new tab named "Hello World Plugin" under "miscellaneous" that loads our frontend module
$GLOBALS['FE_MOD']['miscellaneous']['Hello World Plugin'] = DylanHelloWorldModule::class;
The template-file for the frontend module
The template file is used as container for the module. This is where you include the files that are defined in the module, and build the HTML-structure.
./src/Resources/contao/templates/modules/mod_helloWorld.html5
<?php $this->extend('block_searchable'); ?>

<?php $this->block('content'); ?>

<!-- The value of the message-variable is displayed here -->
<div class="dylan-hello-world-container">
    <?= $this->message; ?>
</div>

<?php $this->endblock(); ?>
Including CSS and JS in the Contao-module
Custom CSS- and JS-files can be included in the Contao-Module as they've been defined in the <a href="#frontend-module-class-heading">Frontend-module</a>. You'll have to do is adhere to the following structure (the name of the file does not matter):
./src/Resources/public/scripts.js
./src/Resources/public/styles.css
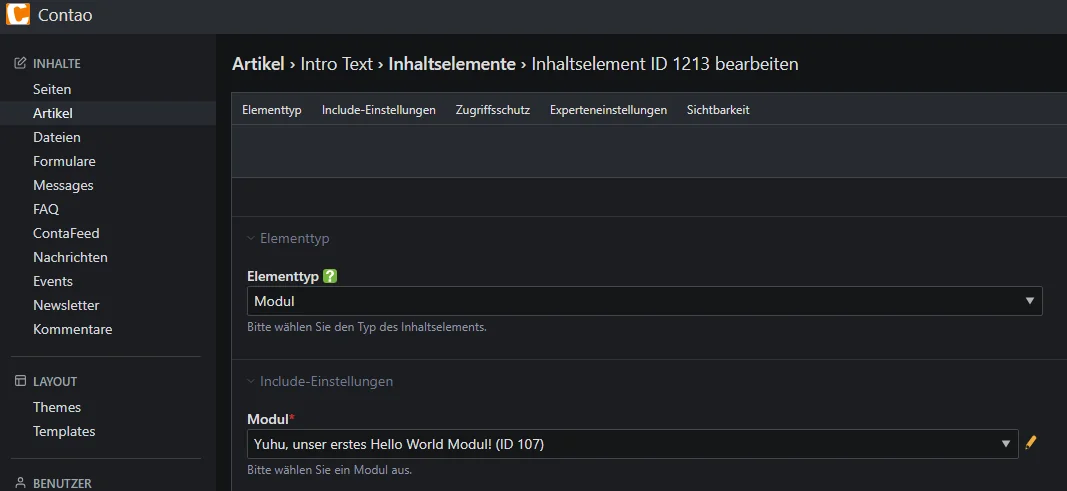
...and there we go, we can now create a new module in the backend-area under Themes > Frontend Module and select the Hello World Plugin as module type!
Then select the article (or similar) and insert your newly created module.


Whew, that's already a lot of work... and still no quite enough! While our frontend module can display something nice that's equipped with PHP-functions... how about loading content from the database that is managed in the Contao backend?
We'll have a close look into that in the next section.
Contao Backend module: Structure and database integration
In this section we'll create a backend module that reads data from a table named tl_messages and enables the user to modify the data. It should also be displayed as menu entry in the contao backend.
We'll also extend the frontend module so that it uses the data from the backend module.
Database table reation with DCA
The DCA php file is used to tell Contao to create a new database table.
This allows you to configure the structure of the table and define how the data should be displayed.
./src/Resources/contao/dca/tl_messages.php
<?php
use Contao\DC_Table;

// The name of the new table; the php-file should have the same name.
$GLOBALS['TL_DCA']['tl_messages'] = [

    // Define what should be displayed in the backend
    'palettes' => [
        'default' => '{messages_legend},message;'
    ],

    // Define the SQL-fields here:
    'fields' => [
        // This field is mandatory.
        'id' => [
            'sql' => "int(10) unsigned NOT NULL auto_increment",
        ],
        // This field is mandatory.
        'tstamp' => [
            'sql' => "int(10) unsigned NOT NULL default '0'",
            'label' => 'TS',
        ],
        'message' => [
            'inputType' => 'text',
            'eval' => ['tl_class' => 'w50', 'maxlength' => 255],
            'sql' => "varchar(255) NOT NULL default ''"
        ]
    ],

    // Define the keys and additional attributes here.
    'config' => [
        'dataContainer' => DC_Table::class,
        'sql' => [
            'keys' => [
                'id' => 'primary'
            ]
        ]
    ],

    // Define here how the whole thing should be displayed in the Contao backend.
    'list' => [
        'sorting' => [
            'mode' => 1,
        ],
        'operations' => [
            'edit',
            'delete',
        ],
        'label' => [
            'fields'  => ['id','message'],
            'showColumns' => true,
        ]
    ],
];
Adding translations
The translations XLF file can be used to define translations for labels and descriptions of the fields.
./src/Resources/contao/languages/en/tl_messages.xlf
<?xml version="1.0" ?><xliff version="1.1">
<!-- Format: contao/language/LANGUAGE-TAG/TABLE.php-->
  <file datatype="php" original="contao/languages/en/tl_messages.php" source-language="en">
    <body>
        <!-- Contao backend label definitions -->
        <trans-unit id="tl_messages.messages_legend">
            <source>Messages</source>
        </trans-unit>
        <!-- Text of the label for the field "Nachricht" -->
        <trans-unit id="tl_messages.message.0">
            <source>Message</source>
        </trans-unit>
        <!-- Text of the description for the field "Nachricht" -->
        <trans-unit id="tl_messages.message.1">
            <source>Your individual message.</source>
        </trans-unit>
    </body>
  </file>
</xliff>
Porting the backend module into the Contao backend
The configuration PHP file has to be adjusted as for the frontend module.
./src/Resources/contao/config/config.php
<?php
use Time4digital\DylansHelloWorldBundle\Module\DylanHelloWorldModule;

// Frontend modules
// Display a new tab "Hello World Plugin" underneath "miscellaneous" that loads our frontend module.
$GLOBALS['FE_MOD']['miscellaneous']['Hello World Plugin'] = DylanHelloWorldModule::class;

// Backend modules
// Display a new menu entry "Messages" underneath the menu category named "messages", that manages the table tl_messages.
$GLOBALS['BE_MOD']['content']['Messages'] = [
    'tables' => ['tl_messages']
];
Displaying backend data in the frontend
In order to display backend data, we'll have to adjust the template as well as the frontend module.
./src/Module/DylanHelloWorldModule.php
<?php

namespace Time4digital\DylansHelloWorldBundle\Module;

use Contao\Module;

// Include CSS and JS files here. Format: bundles/bundleName/fileName.dataExtension
$GLOBALS['TL_CSS'][] = 'bundles/dylanshelloworld/styles.css';
$GLOBALS['TL_JAVASCRIPT'][] = 'bundles/dylanshelloworld/scripts.js';

class DylanHelloWorldModule extends Module
{

    // Set the name of the template here.
    // The name must match the template name definde here ./src/Resources/contao/templates
    protected $strTemplate = 'mod_helloWorld';

    protected function compile()
    {

        // Created variables that can be used within the template with $this->Template->nameVariable
        $this->Template->message = 'Hello World!';

        // The Module-class enables us to quickly fetch database entries using Contao's Database-class.
        // Here we fetch data using an SQL-query and stores them in an array.
        try {
            $objEntries = $this->Database->execute("SELECT * FROM tl_messages");
            $this->Template->entries = $objEntries->fetchAllAssoc();
        } catch (\Exception $e) {
        // If this didn't work, return an empty array instead.
            $this->Template->entries = [];
        }
    }
}
./src/Resources/contao/templates/modules/mod_helloWorld.html5
<?php $this->extend('block_searchable'); ?>

<?php $this->block('content'); ?>

<!-- The value of the message-variable is used here. -->
<div class="dylan-hello-world-container">
    <?= $this->message; ?>
</div>

<!-- We loop through the array and extract the value of the message attribute for each entry. -->
<div class="dylans-hello-world-live-container">
    <ul>
        <?php foreach ($this->entries as $entry): ?>
        <li><?= $entry["message"]; ?></li>
        <?php endforeach; ?>
    </ul>
</div>

<?php $this->endblock(); ?>
Finally, we've got it! After many ups and downs, we have reached the summit. Time to rejoice! ;-)
After reinstalling the plugin, there should now be a new menu entry named "Messages", that can be used to create new messages to be displayed by our frontend module.

We hope that you have learned more about Contao plugin development through this blog article.
It is important to note that there's more than one way the implement this plugin, and this article is simply one of many examples. It is up to you how you develop your Hello World plugin, as long as the base structure is correct so that the Contao Manager recognizes and installs it as such.
You can find more informations on plugin development here.
Feel free to download and of course extend the code for this example via this Link.
Thank you for reading this blog article! I hope you enjoyed I hope you had fun and learned something along the way. Happy developing!
This article is also available on Medium.com.